Wednesday, March 31, 2010

DREAM OF HAVING AN AMATEUR PIANIST AT HOME

We both have no music talent unfortunately. My hubbie loves listening to music but he does not know how to play any musical instrument. And despite my parents' great effort and investment to discover any untapped artist talent inside me, they eventually gave up after my private keyboard tutor frankly told them that I am kind of music deaf. And the only music-related thing I could keep in my mind is simply the beginning music notes of the song "Silent Night" which starts with "sol la sol mi...".

As a result, we hope to invest in Mew's music appreciation ability since her school age so that she can know how to play a musical instrument. Needless to say, even being an amateur music player, she will have more advantage in her personal and social life. Therefore, on her birthday, we decided to give her a musical keyboard (after having consulted with her of course). Mew had no clear idea of which instrument she liked or wanted to play so we chose the electronic keyboard which seems to be easy to play and carry. If she expresses any substantial interest in this keyboard, we will upgrade to a piano and invite a private tutor to teach her formally. 

I tried to google some easy piano lessons online so that I myself can imitate and learn to play the keyboard first then teach Mew later. It was a bit difficult initially when I even could not read the music note. But with some more searches, I finally found out something really useful for a beginner. Moreover, I learnt from our keyboard's guide book that this one has some teaching functions so that a player could simply repeat the same music keys on the screen in order to play well some popular songs. My husband now even can play the song "When the Saints go marching in" and I can play other very simple songs such as "Happy Birthday to you", "Twinkle twinkle little stars' and "Frere Jacques". How amazing it it! Mew has been able to play the first part of the song "When the Saints go marching in" and I noticed that her fingers worked very well on the keyboard. However, she has not yet developed a great interest in playing keyboard so we still have to wait and see.
Here are some very useful website to learn it yourself how to play pianos:
- A virtual keyboard-piano: You can even play the music on a keyboard/piano anytime without having one. Fantastic!
- Youtube video to teach you hand-on experience of playing the song "When the Saints go marching in"- this is my first online piano lesson ever!
- Music Tech teacher can help you to play the keyboard/piano with or without the official knowledge of music notes. Go to the section "Flash Piano Practice Keyboards" to find samples of songs including Frere Jacques, Jingle Bells, My country tis of thee, Chpstix, Ode to joy, Twinkle twinkle, When the saints go marching in, Surprise symphony, and Love somebody. Extremely useful for a beginner!
- 5 video lessons will have you learning the basics, and playing your first song, in less than fifteen minutes!
- Ready to venture more into the realm of music? Music Theory Online is a great site that teaches you all aspects of musical theory in a series of Flash-based lessons. Learn about notes, clefs, scales and much more.
- Music for a phone keypad can help you to kill the waiting time for fun.

Good luck with your kid's (and maybe your own) music journey!


Wednesday, March 24, 2010

LUNCH IN A BOX

Last year at the daycare, we did not have to worry about Mew's lunch because it was included in the tuition. The daycare teacher also helped the kids to eat their lunch and the atmosphere was very comfortable for young kids. It is totally different at the kindergarten however. Kids must bring their own snack and lunch to school and the lunch time is very limited with only 1-2 minutes for warming their lunch in the collective microwave. Although there are supervisors at lunch but they do not "help" kids as before. Consequently it becomes a headache for parents to prepare their kid's lunchbox to ensure a proper nutritious value but it is not too complicated for kids to handle it by themselves. It cannot be too much either because kindergarteners are often not able to finish a big lunch within 30 minutes. It should be easily frozen and defrozen or microwaved so that kids do not have to wait too long for their meal to be warmed. It should be also attractive enough so that kids do not get bored with their lunch, etc. A lot of things need to be taken into account.

Although I am very admired at Biggie at Lunch in a box, I unfortunately am not as talented as her nor love cooking enough even for the sake of my kids to venture myself into a lunch-preparation journey. So, I decided to make it simpler for both me and Mew. Luckily, Mew is not a picky eater and normally she eats what I prepare for her, and sometimes she is even more than happy with the same meal for all 5 days in a row if she really likes the ingredients. Thank you, Mew, for your complete change in eating habit since your age of 4. If not, we parents would have already died from exhaustion to cater for your food needs.

Here is some pictures of Mew's lunchbags. The Princesses one can be put inside a medium-sized backpack but the two-compartment California Innovations lunch bucket cannot fit Mew's daily backpack so she has to remember taking it back and forth (she has forgotten twice so far but luckily found it later).


The most frequent lunch I prepare at home for her from scratch includes fried pasta with vegetable and soy sauce, glutinous rice made in shapes with seaweed and shaped boiled egg, mashed potato with cheese, milk and egg, fried mixed rice, sandwich bread with slices of cheese and ham made into funny shapes.

 
This is the lunch for tomorrow. Mew insists on having her "fake sushi" so I cooked glutinuous rice with grean bean and molded it while still very hot to make star, heart, flower, triangles and onigri shapes. I used seaweed to roll around each shape and also cover their facets. Next compartment is fresh vegetable, namely carrots, mushroom and olives. I put a small container of Ranch sauce for Mew to dip the veggie. To ensure the protein input, I boiled an egg and molded it into a fish shape. Finally, for her dessert, I tossed in some Funcheez (dinosaur-shaped cheese) and Allens fruit punch.

 
This "obento imitation" lunch was from last week. The same recipe with "fake sushi". The egg was mold into heart shape and cut into halves (due to the lack of time, this egg did not shape well). I did not forget vegetable with mini carrots and steamed cauliflower florets. I grilled a hotdog then cut it small and poured some Heinz ketchup sauce (Mew prefers chili sauce but she coughed a lot so I did not allow her to touch any spicy ingredients).

 
The most popular mixed fried pasta with a lot of kinds of vegetables, frozen imitation crab or sometimes cooked ham, pasta sauce or soya sauce, olive oil and voila ... enough for 3 ready-to-go meals in the freezer.

Quick and easy - toasted sandwich bread slice cut into snowman, Xmas bell and frog shapes by cookie cutters with cheese slice of the same shape in between. I tried to make a funny face for the snowman but finally his eyebrows made him a bit scary instead. Mew's lunch cannot be without some veggies so I tossed in mini carrot and olives. To add some more flavours, I grilled a BBQ hotdog with some melt cheese and dropped a little ketchup sauce.

 
Very traditional recipe of mixed fried rice with enoki mushroom, jambon, asparagus and egg. Seasoned with soy sauce as usual.

  
For her snack, I put button cookies, banana, apple, strawberry or blueberry, grape, etc. For her beverage with lunch, I give her juice, Kool-aid jammer, soy drink, etc.


And above is her ustensil kit including spoon, fork, chopsticks, toothpick, tissue, ice blanket or ice pack, toothbrush and small cup for oral cleaning after lunch.

Sunday, March 21, 2010

IT IS SO IMPORTANT TO HANDWRITE NEATLY AND BEAUTIFULLY


Mew's writing has been significantly improved since our last home visit when we invited a private tutor to teach her to read our mother language. Though at that time Mew was really reluctant to learn both reading and writing and we did not focus much on writing skills, the long-term effect of an intensive course with discipline and a lot of homework proved to be very positive to her handwriting currently. I could proudly say that Mew's handwriting is not only the best in her class but also much better than her teacher's. Here is an example piece of her handwriting (and don't forget that she has just begun learning how to write within 1 month only - and since we came back here we have almost had no time to schedule her writing practice session):


It seems not to be surprising at all when the pedagogique method here does not consider it important to teach writing neatly and beautifully. For the teachers, it is more important that their students recognize well the letters and the students are encouraged to write them correctly. It appears to us that here they prefer to apply the democratic idea to everything including primary education and thus it is totally free for the students to express their own characters through free writing without any discipline or model to follow strictly. But in our home country, to write correctly is far from enough for a good student. She or he must learn to write neatly, beautifully, almost perfectly. And the teachers there use marks on the scale of 1-10 to evaluate the handwriting practice work of each student. It is impossible to tell if one method is better. But for us, to handwrite neatly (and beautifully to a prescribed model) is an important way to teach the students the patience, the diligence, the continuous efforts to practise daily, the discipline, the organization skills, etc. since their early childhood. In short, one's handwriting would reveal parts of his/her characters.

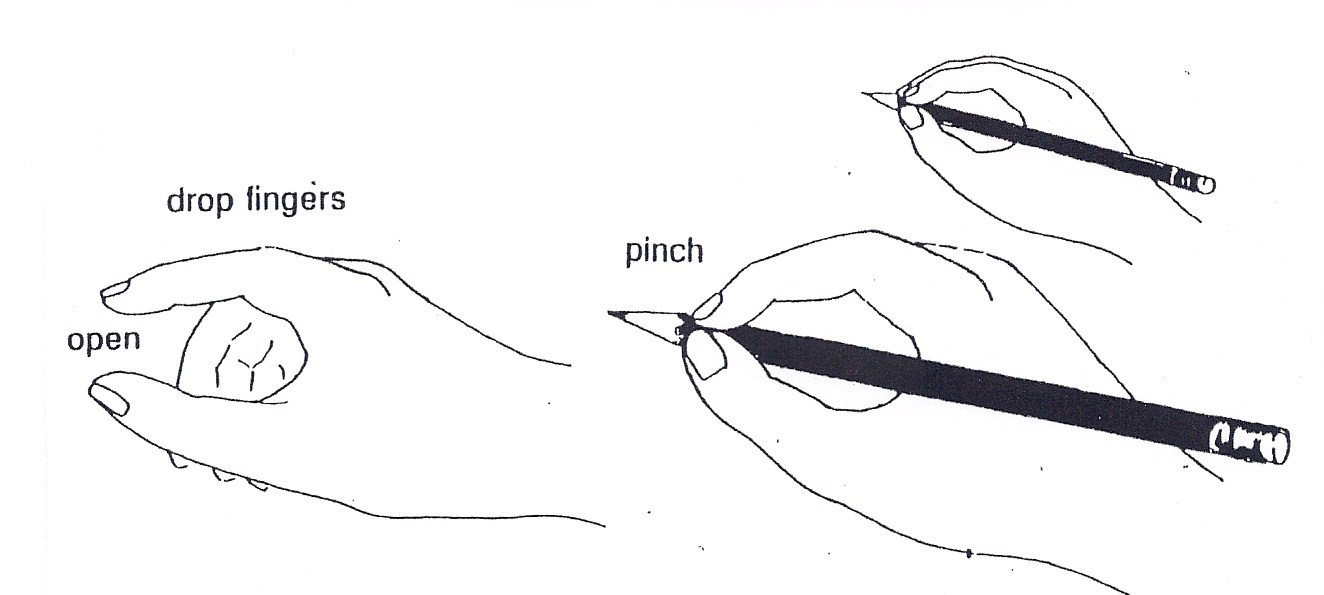
The Light Educational Ministries Phonics Manual shows you how you can teach writing formations and lists "Three P's of Writing Preparation: Posture, Pencil Grip and Paper Position." The LEM manual lists these important rules-

  • Posture
    • Sit with buttocks pushed to the back of chair.
    • Have feet flat on floor (use a footstool is the chair is too high).
    • Head should be held up, not drooping forward. A drooped head strains neck and back muscles.
    • Back should be straight, with the trunk leaning forward from the hip joint for a comfortable writing position.

  • Pencil Grip
    • Use a six-sided (hexagonal) pencil. Hold it between thumb and middle finger. The pencil should be held lightly enough so that it can be pulled out of the hand easily, but firmly enough to maintain good control. Hand and finger muscles should not be tightly tensed.
    • Write with the point of the pencil and hold it just above the shaven area.

  • Paper position
    • The side edge of the paper should be parallel to the arm holding the pencil. The other hand should rest above the writing to steady and move the paper up and down as needed.
    • The left-handed student will do the same, but the paper will be at the opposite angle. Be sure that the left-handed student rests his pencil hand below the baseline, not above the writing.
And some tips from kindergarten teachers who have been working with kids to teach them how to hold a pencil correctly:
- the 'driving' grip: The thumb is the steering wheel and index is mum and dad driving, the 3 kids are in the back but the middle one is learning to drive so she watches closely but sometimes she is naughty and tries to get into the driver's seat.

Further resources on teaching handwriting to your kids can be found at these sites:
- How to Teach Handwriting (techniques)
- Teach your child to write (a collection of references and resources)


Monday, March 15, 2010

WHEN A KISS SHOULD BE A REAL KISS?


I was so uncomfortable, embarrassed and awkward when Mew tried to kiss me on the lips one day, lol, a real passionate kiss. She leaned back down to my face and held my head to search for my lips and tried to let her lips touch my lips. She wanted a lip-lip kiss!!! Since her birth, I have kissed her foreheads, her nose, her cheeks, her neck, her hands, her feet, her belly button, etc. but never her lips. Answering my question why she had such bizzare action, she told me innocently: "It's love, Mom. The way they kiss each other in the movies. Like the prince and Cindrella or other couples". Oh my God, that's where she got her idea of expressing her love to me in a physical contact of lips, ewhhh!!! So even though we do not have a cable TV so that her screen time could be controlled, we do have a DVD player and children's classic movies. I did not even pay attention that the two main characters of some movies exchanged their real kiss and I have also never expected that scene in a children's movies. But surely that's the only source of Mew's entertainment and she must have learnt how to kiss from those movies. Well, so what should I do now to explain to her that such way of kissing is not appropriate to her age? What if she asks why the adults can kiss on lips but not children? Should I just simply say that a lips-lips kiss is only lovers' kiss?

Wednesday, March 10, 2010

WANNA BE A MAGAZINE COVER STAR? TOO EASY!


Parenting Cover Model Maker Think your little darling's cute enough to be on the cover of Parenting? This Cover Model Maker can take an ordinary digital pic and turn it into the cover of Parenting. It takes just minutes, it's easy, and it's free! - Accept various file extensions including JPG, PNG and GIF - Headlines can be modified to your preferences - You can either print out the personalized cover or download it to your computer or email it to your friends!

Cannot resist the temptation of showing off your kids on the cover of
Today's Parent magazine published in Canada? Simple use their online cover maker and voila, a real magazine cover with even a barcode is ready for you to proudly send to your friends or to print out right away.


American Baby magazine Cover Maker Who does not love the idea of putting her adorable baby on the cover of American Baby magazine? Plus, you can customize your cover with different layouts and personal cover lines. Cons: Only JPEG files under 1MB accepted. No option of download the file to your computer.
Parents offers the same Magazine Cover Maker to its website registered members. It takes you, however, 1 more minute to be able to access their free tool because you need to fill in a form to register your username, password. But this online cover maker allows you to upload up to 6 photos at a time to your album and choose among 3 magazine covers including "Parents", "American Baby" and "Family Circle" to show off your kids. Furthermore, you can even add add graphics, frames and text to your photos to make them more attractive and more professional. Be sure to click on the button "Want to be a cover model? Make a magazine cover" to get back to the Magazine Cover Maker after completing your album build-up and follow their instructions to view finally your cover.
A similar online cover maker with the same cons can also be found at Your Pregnancy.

You can even create your own magazine covers with the ready-made templates like "
My Child", "Parenting", "Baby" or "Kid".

Somehow more complicated but more creative to make your own magazine cover from scratch,
Big Huge Labs offer a free online magazine cover maker that allows you to upload your pics not only from your computer but also from your Flickr albums or Facebook account.

And, is it even more fantastic if you can have your freshly-made magazine cover printed and shipped to your door? Sure that you can. Print out your collection of magazine covers in the form of a FREE photo book offered by HotPrints and get free shipping - Yes, totally FREEEEE! No catch at all! One photo book (HotBook) every month for (free) registered member (
This offer is currently limited to HotBooks to be shipped to addresses in the US, UK and Canada only).

Monday, March 8, 2010

MEW'S HAPPY WEEK

Last week was the Spring break here and Mew did not have to go to school, hoorray!!! So she just stayed at home with us and enjoyed playing games alone or with parents.

I took Mew to the Grande Bibliotheque with the aim to getting her and myself library subscription cards but unfortunately we forgot our proof of address and finally came home in vain. However, I did get a remote access to the library's electronics resources simply by filling in an online form. It is in fact more useful for us since we might not have enough time to go to the library in person but we could use the library's portal with the authentication to get the access to various interesting database. Youth Space or L'espace jeune is undoubtedly among the most favourite destination for Mew during her learning journey here.

I babysat Mew and Helen, her best friend, for two mornings. We played some simple games to reinforce their French vocabulary. Helen's French now appears to be better than Mew, mostly thanks to her special passion for learning everything and also because of Mew's 2-month absence from the French school. We will need to work with the private tutor to help Mew more in improving her French oral communication skills.

A good news is that Mew seems to become better with her mathematics addition skills after some practice with me. Although she does confuse sometimes between numbers such as 19 and 91 but generally she can presently add up to 20 without much problems. I used the game board of Snake and Ladder game to teach her to count up to 100. Then we taught her to do some basic additions using her fingers. The important thing we taught her at the beginning is the communitative characteristic of addition problems, where 5+8 = 8+5. Based on that characteristic, we instructed her to focus on the bigger number in the addition problem, thinking of it as an already-got quantity and subsequently adding the remaining amount on top of that quantity (she might use her fingers at first but would gradually wean off this habit). With a lot of repetitions, Mew becomes quicker in obtaining the result for an addition problem. We together cut out a lot of blank flash cards (in fact, tiny pieces of card) and I wrote down an addition problem in one side such as 9+4= and on the other side of the same card Mew wrote down the correct result. When finishing making the whole set, we put them all into a plastic container (a blueberry container - good habit of recycling, lol). Mew drew one card at a time, looking at the addition problem and without seeing the reverse side of the card needed to tell me the result within 5 seconds. If she was correct, she could keep her card and put it into another "Correct" container. If not, the card would be put into an "Incorrect" container and we would concentrate on practising more with those "tricky" problems. So far this method has worked fine for us. I hope that Mew would be perfect in adding up to 20 soon so that we could move to the stage of learning to fill in the missing number in an addition problem before attacking the subtraction subject.

This week we also tried a new board game: "Sorry!" game which is in fact a kind of Horse race game in our country. A simple game using cards to tell your moves instead of a dice. Mew could of course learn to count in this game. However, similar to the other board game we mentioned earlier (Destines, Le Jeu de la vie), this game is not really a strategic one and mostly based on luck. Mew won the last time we played and that motivated her very much, lol.

We also had a wonderful night at the Centre Bell to watch the Disney on Ice Princess performance. It was a marvel indeed and we did not regret spending money for this special treat for the whole family. Although our seat row was a little backward but it allowed us to have a panorama view instead. Mew enjoyed the show very much and her most favourite character was Cindrella as usual.

Oh we almost forget to mention our puppetry night show during La Nuit Blance 2 weeks ago. It was fantastic! We were so admired at the creativity and the talent of the participating artists. I will add more information later when I have more free time.

Finally, on Sunday afternoon, we watched with great enthusiasm the glass sculpture demonstrations by GĂ©rald Collard, a glass-blower. It’s a educational activity that is rather out of the ordinary. From just a small tube of glass, he created various objects amazingly. Even us as adult audience could only say "Wow!". After that, three of us cheerfully enjoyed the drop-in Art workshop with the topic "Seeing through Colour": there we created our own plastic glass in transparent colour. With a piece of paper, we drew whatever our imagination can think of and then put it inside a plastic glass, copying our picture on the outside of the glass by permanent ink markers. At the end, we all were so proud of our work of art and we did bring them home for a display.


Well, so that's enough for a summary of the Spring break week activities in our family. Today Mew starts going back to school and our rhymth of life changes back to normal. Excitedly looking forward to summer break, yeahhh!

Tuesday, March 2, 2010

A COOL MATH METHOD: LATTICE MULTIPLICATION

I dropped by the CoolMath4kids site while on the way to find best ideas to teach Mew basic math skills and found out the Lattice Multiplication, a super cool math method which I am sure will get a hit for any student scare of doing 2-digit or even more multiplication problem.

Googling the phrase of Lattice Multiplication yielded me further information about this method.
According to Dr.Math, "the Lattice Form of Multiplication (the official name for this method) dates back to the 1200s or before in Europe. It gets its name from the fact that to do the multiplication you fill a grid which resembles a lattice one might find ivy growing on".

While we are all familiar with the regular method of multiplication that always takes 2 steps: multiply and carry altogether, then add, the lattice method does breaks the multiplication process into 3 separate smaller steps, hence a lot of students (including myself) find it really easier! Put it simple, lattice multiplication is a method of multiplying large numbers using a grid. Digits to be carried are written within the grid, making them harder to miss.

LEARN NC, a program of the University of North Carolina at Chapel Hill School of Education, demonstrates step-by-step this useful method as follows:

- First, draw a grid that has as many rows and columns as the multiplicand and the multiplier.
- Next, draw a diagonal through each box from upper right corner to lower left corner. Continue the line a short way past the grid.
- Write one factor across the top and the other down the right side, lining up the digits with the boxes.
- The multiplication is performed by multiplying the digits at the head of each row and column. Fill in each square of the grid with the product of the digits above and to its right, recording the products so that the tens are in the upper (diagonal) half of the square and the ones are in the lower half.


If the product does not have a tens digit, record a zero in that triangle.

- Now add the numbers in the grid along the diagonals, starting from the lower right corner. (“ride the slide.”) Carry any tens into the top of the next diagonal.


- To find the answer, read the digits starting down the left of the grid and continuing across the bottom.


More interestingly and importantly, lattice multiplication can easily be extended to multiply decimal fractions. Suppose, we want to multiply 2.314 by 1.57. We would proceed as before, but draw lines from the decimal points down and to the left until they meet, then follow the diagonal to the left or bottom of the grid. The point where this diagonal emerges from the grid is the position of the decimal point in the answer.